

If You Know Sass, You Know ES2015
Published on
If You Know Sass, You know ES2015!…well not exactly, but there are a surprising number of similarities! While learning about the latest ECMAScript specification, ES2015 (formerly known as ES6), I came upon a few features that I immediately recognized from Sass. And I kept seeing more and more similarities pop up. A lot of the concepts of Sass development transfer over quite nicely, so if you know some Sass, you’re probably a lot better off than you may think when it comes to diving into modern JavaScript, and visa versa.

Sass Lang and ES2015 #
The Sass language was written very intentionally. It was originally released in 2006, and being written in Ruby, also imitated the Ruby syntax and some of its language decisions. Among other features, semicolons and curly braces emerged in version 3.0.0, which made Sass feel more like (and let it become compatible with) CSS. That change, plus the extensible core Sass functionality of SassScript, meant that there was now a robust programming language newly compatible with CSS. Styling became much more powerful and programming appealed to a wider audience of designers and visual developers. Unfortunately, Sass devs still get flack for not being “real devs.” I hope this post changes those minds.
The more I learn about ES6 features, the more it looks like @SassCSS to me.
— Una Kravets (@Una) August 19, 2015
(i.e. maps, classes, interpolation, constructors)
Am I crazy?
There’s a lot of thought behind every Sass language decision, with a big emphasis on clarity over customization (the reason why Sass doesn’t allow for custom properties like PostCSS does). The new ECMAScript 2015 spec (ES2015), released in June of 2015, added a lot of new and very useful features to JavaScript, which also made it more clear and less convoluted to use.
While most browsers still don’t yet support ES2015, you can use a transpiler, like Babel to convert the code into compatible ES5. The precompile step (yes, I know they’re not exactly the same) is only the beginning of the similarities of the two languages.
There are a lot of Sass features now implemented in ES2015 that you might not realize you have familiarity with as a Sass developer, and visa versa about Sass if you’re a JavaScript developer.
1. Template String Interpolation #
This ES2015 feature is the first time I realized how similar the two specs were. The string interpolation is almost identical (and it made me smile a lot). Basically, ES2015 introduced an awesome new inherent string templating feature based on back-ticks.
This means you no longer need to use an external templating engine for basic strings and static DOM manipulation (in many cases). Which is great! And allows for more uniformity among code bases.
It looks like this — instead of:
"First Name: " + fName + "\nLast Name: " + lNameYou can simply write:
`First Name: ${fName}
Last Name: ${lName}`
This is just like Sass! Keep in mind, in Sass, variables look like this: $varName, and because that $ is already taken, it uses a # to denote interpolation.
//.js
variable: ${varName}
//.scss
“variable: #{$varName}”
String interpolation is super handy when writing Sass mixins and writing any sort of output (i.e. via the CSS content property) to the DOM. We’ll see in a later example (maps) why this is so crucial and common to use in Sass development.
2. Argument Defaults #
Argument defaults are so useful when it comes to making flexible functions (and mixins in the case of Sass!). In the past, I’ve used them a lot in Sass to give a pre-determined default argument value when one is not specified in a function or mixin, giving the option to write your own value or to leave it out and accept the default. And now, you too can have all of this in JavaScript!
When instantiating your function, you can now set your variable to a default value right in the argument list (just like Sass):
//.js
function sayHello(recipient = “beautiful”) {
return “Hello” + recipient;
}
sayHello();
sayHello(“sunshine”);
/*console*/

> Hello beautiful
> Hello sunshine
//.scss
@mixin showOutline($color: #f00) {
outline: 1px solid $color;
}
.one {
@include showOutline()
}
.two {
@include showOutline(#ccc)
}
/*css ouput*/

.one {
  outline: 1px solid #f00;
}

.two {
  outline: 1px solid #ccc;
}
Also as in Sass, it is important to note that any arguments with default values must follow arguments which do not have a default (in terms of how they are ordered when writing the initial function/mixin). If you think about the why of this rule, you can easily see how if you had an argument with a default option followed by an argument without a default (making it mandatory to set one), it would break if you left the mandatory argument blank.
3. Rest Parameters #
On a similar thread of function/mixin arguments, rest parameters in ES2015 are a lot like the arglist argument types in Sass! Rest parameters (like arglist) must also be the last value of a series of arguments when writing a function.
Rest parameters are created when using the spread operator (...) in a function definition. You may recognize the spread operator for use with iterating items in an array, but using one in a function definition makes it behave a little differently.
You use arglists or rest parameters when there is an indeterminate input length for an argument. For example, in Sass, this is commonly used for box shadows or gradients. In JavaScript, rest parameters are denoted with the ... before the argument, and in Sass, they come after the argument:
//.js
function PrintMe(firstArg, …theRest) {
console.log(firstArg, theRest);
}
PrintMe(‘Hello’, ‘You’, ‘Look’, ‘Nice’);
/*console*/

> Hello ["You", "Look", "Nice"]
//.scss
@mixin funCircle($size, $gradient…) {
width: $size;
height: $size;
border-radius: 50%;
background: radial-gradient($gradient);
}
.entrancing {
@include funCircle(50px, blue 10%, red 80% ,pink);
}
/*css output*/

.entrancing {
  width: 50px;
  height: 50px;
  border-radius: 50%;
  background: radial-gradient(blue 10%, red 80%, pink);
}
In both situations, the arglist/rest parameter values were bucketed and returned together when expected without breaking anything.
4. The “for-of” Loop #
The new looping structure for arrays in ES2015 is very similar to the looping structure in Sass. ES2015 introduced the for-of loop. You may be wondering, how does this differ from for-in?
The for-of loop iterator refers to the array value, not the index. It is more flexible and lets you loop over data (the values in an array) instead of over object properties (what the for-in loop does). Because of this limitation, one of the problems with for-in is that you can’t break out of or return from a for-in loop.
With Sass, any looping works the same way as for-of and not for-in, whether that be a map or a list, or a list of lists. While the syntax is different (each-in vs. for-of) the looping mechanism is the same:
//.js
let colorArray = [“red”, “yellow”, “green”];
for (let color of colorArray) {
console.log(color);
}
//.scss
$colorList: “red”, “yellow”, “green”;
@each $color in $colorList {
@debug $color;
}
If I used for (let color in colorArray) (in instead of of) the result would be 0, 1, 2 instead of red, yellow, green. This shows the biggest difference in how these loops work.
5. Maps #
The latest ECMAscript Spec provides us with a new data structure: maps! Maps are excellent for configuration and allow access to their elements in key : value pairs. How are these different from objects? Good question. With objects, the “keys” are always converted into strings.With maps, values of any type can be keys without being converted into strings. You should still use objects when mixing value types and when you know all of the values before runtime, but maps are really useful otherwise.
Maps are also iterable! So you can use the same syntax as shown above (in the for-of loop) to obtain values (also doable in Sass!). Here is a basic example:
//.js
let colorMap = new Map();
colorMap.set(“primary”, “red”);
colorMap.set(“secondary”, “yellow”);
colorMap.set(“tertiary”, “green”);
for (let [key, value] of colorMap) {
console.log(key: ${key}, value: ${value});
}
/*console*/

> key: primary, value: red
> key: secondary, value: yellow
> key: tertiary, value: green
//.scss
$colorMap: (
“primary”: “red”,
“secondary”: “yellow”,
“tertiary”: “green”
);
@each $key, $value in $colorMap {
.color—#{$key} {
color: #{$value};
}
}
/*css output*/

.color--primary {
  color: red;
}

.color--secondary {
  color: yellow;
}

.color--tertiary {
  color: green;
}
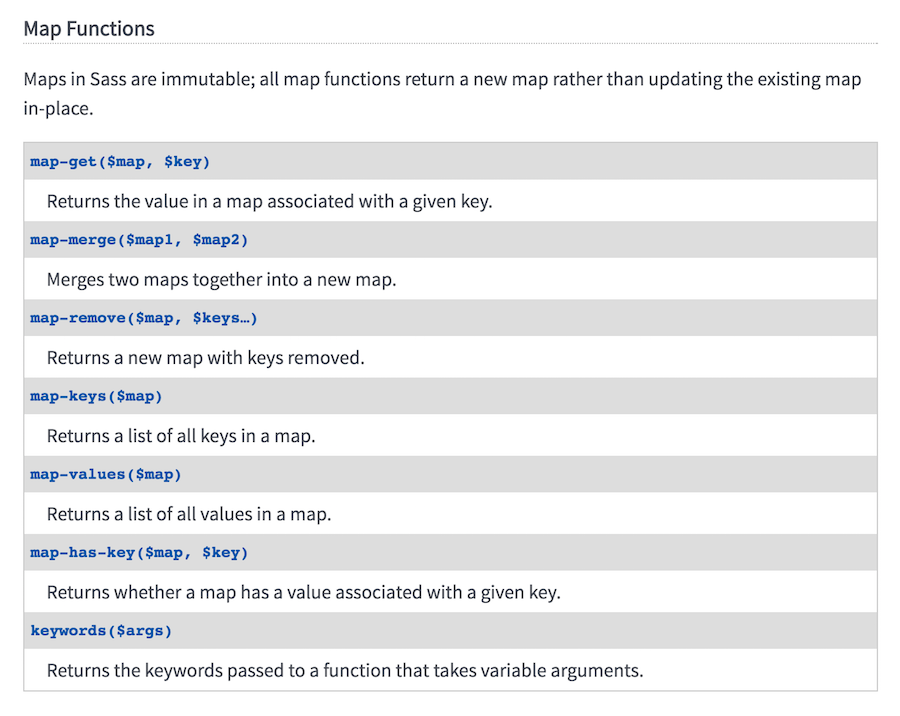
Sass provides a few more map niceties like the map-get function, which is commonly it is used to reference map values, and map-has-key which is very helpful in debugging:
//.scss

@if map-has-key($colorMap, $color) {
    $color: map-get($colorMap, $color);
} @else {
  @if type-of($color) != color {
    @error "Invalid color name: `#{$color}`.";
  }
}
Javascript has get and set map methods too! It is simply get() instead of map-get() for JavaScript:
//.js

var colorMap = new Map();
colorMap.set("primary", "red");

colorMap.get("primary");
// red
You can use Sass (as well as JS) to delete from maps, merge, zip, etc. They are a really nice way to organize code, from object information to colors to z-indices.
6. Class Extends #
Last but not least, ES2015 brings us classes (well, not real classes, but a bit of syntactic sugar over prototypes that let us pretend to write classes). With classes come extends! (Sound familiar yet?)
They work very similarly to the Sass @extend directive. In Javascript, extends allows you to create a new class which inherits the methods and properties from its parent class. (Then, the super() method allows access to the new class’ parent methods). For example, in the case of class Corgi extends Dog), Corgi can access Dog’s bark() method with super.bark().
You can also run this in the constructor to instantiate all of the parent’s methods. Doing this allows extends to work like @extend!
Confused? It’s easier to show:
//.js
class Dog {
constructor(name) {
this.name = name;
}
bark(words) {
console.log(WOOF!!! ${words} WOOF!);
}
}
class Corgi extends Dog {
constructor() {
super();
}
waddle() {
// corgi waddle
}
}
//Steve is a cori
let steve = new Corgi;
//Steve can bark like a Dog
steve.bark(‘I like bacon!’)
//AND Steve can waddle, too!
/*console*/


> WOOF!!! I like bacon! WOOF!
//.scss
.plain-link {
font-weight: 600;
text-decoration: none;
border-bottom: 2px dotted currentColor;
}
.pink-link {
@extend .plain-link;
color: hotpink;
}
.blue-link {
@extend .plain-link;
color: blue;
}
/*css output*/

.plain-link, .pink-link, .blue-link {
  font-weight: 600;
  text-decoration: none;
  border-bottom: 2px dotted currentColor;
}

.pink-link {
  color: hotpink;
}

.blue-link {
  color: blue
}
What’s going on in the Sass here is a key difference between @extend and @include for mixins. With @extend we’re grabbing all of the styles from .plain-link and sharing those among each element which is extending it — akin to the JS methods being pulled from the parent class in the JavaScript example. We may then apply additional unique properties (in the case of Sass, the color; in the case of JavaScript, the waddle method), that are not available in the parent, but are available in the child classes that are extending it.
While some of these aren’t perfect comparisons, there are very real connections between Sass and JavaScript at play, especially with some of these new ES2015 features.
I hope you enjoyed this post and learned something new!