

Setting up An Accessibility Dashboard from Scratch with Pa11y on DigitalOcean
Published on
Semantics and accessibility are a really important part of developing web pages. This is not only for users with disabilities, but improving accessibility makes your content easier to share with everyone.
I recently discovered pa11y — an open source project that helps users to set up (for free) an accessibility dashboard of their sites. This is a self-hosted nodeJS + mongoDB app, which means you can set it up internally behind a firewall and compare sites in development. It’s also available on Docker and is fully-customizable. You can edit the front end (written in Less) to match any design system and add any features you’d like.
Out of the box, pa11y comes with:
- Filter system for tasks
- A visual interface for adding, editing, and removing tasks
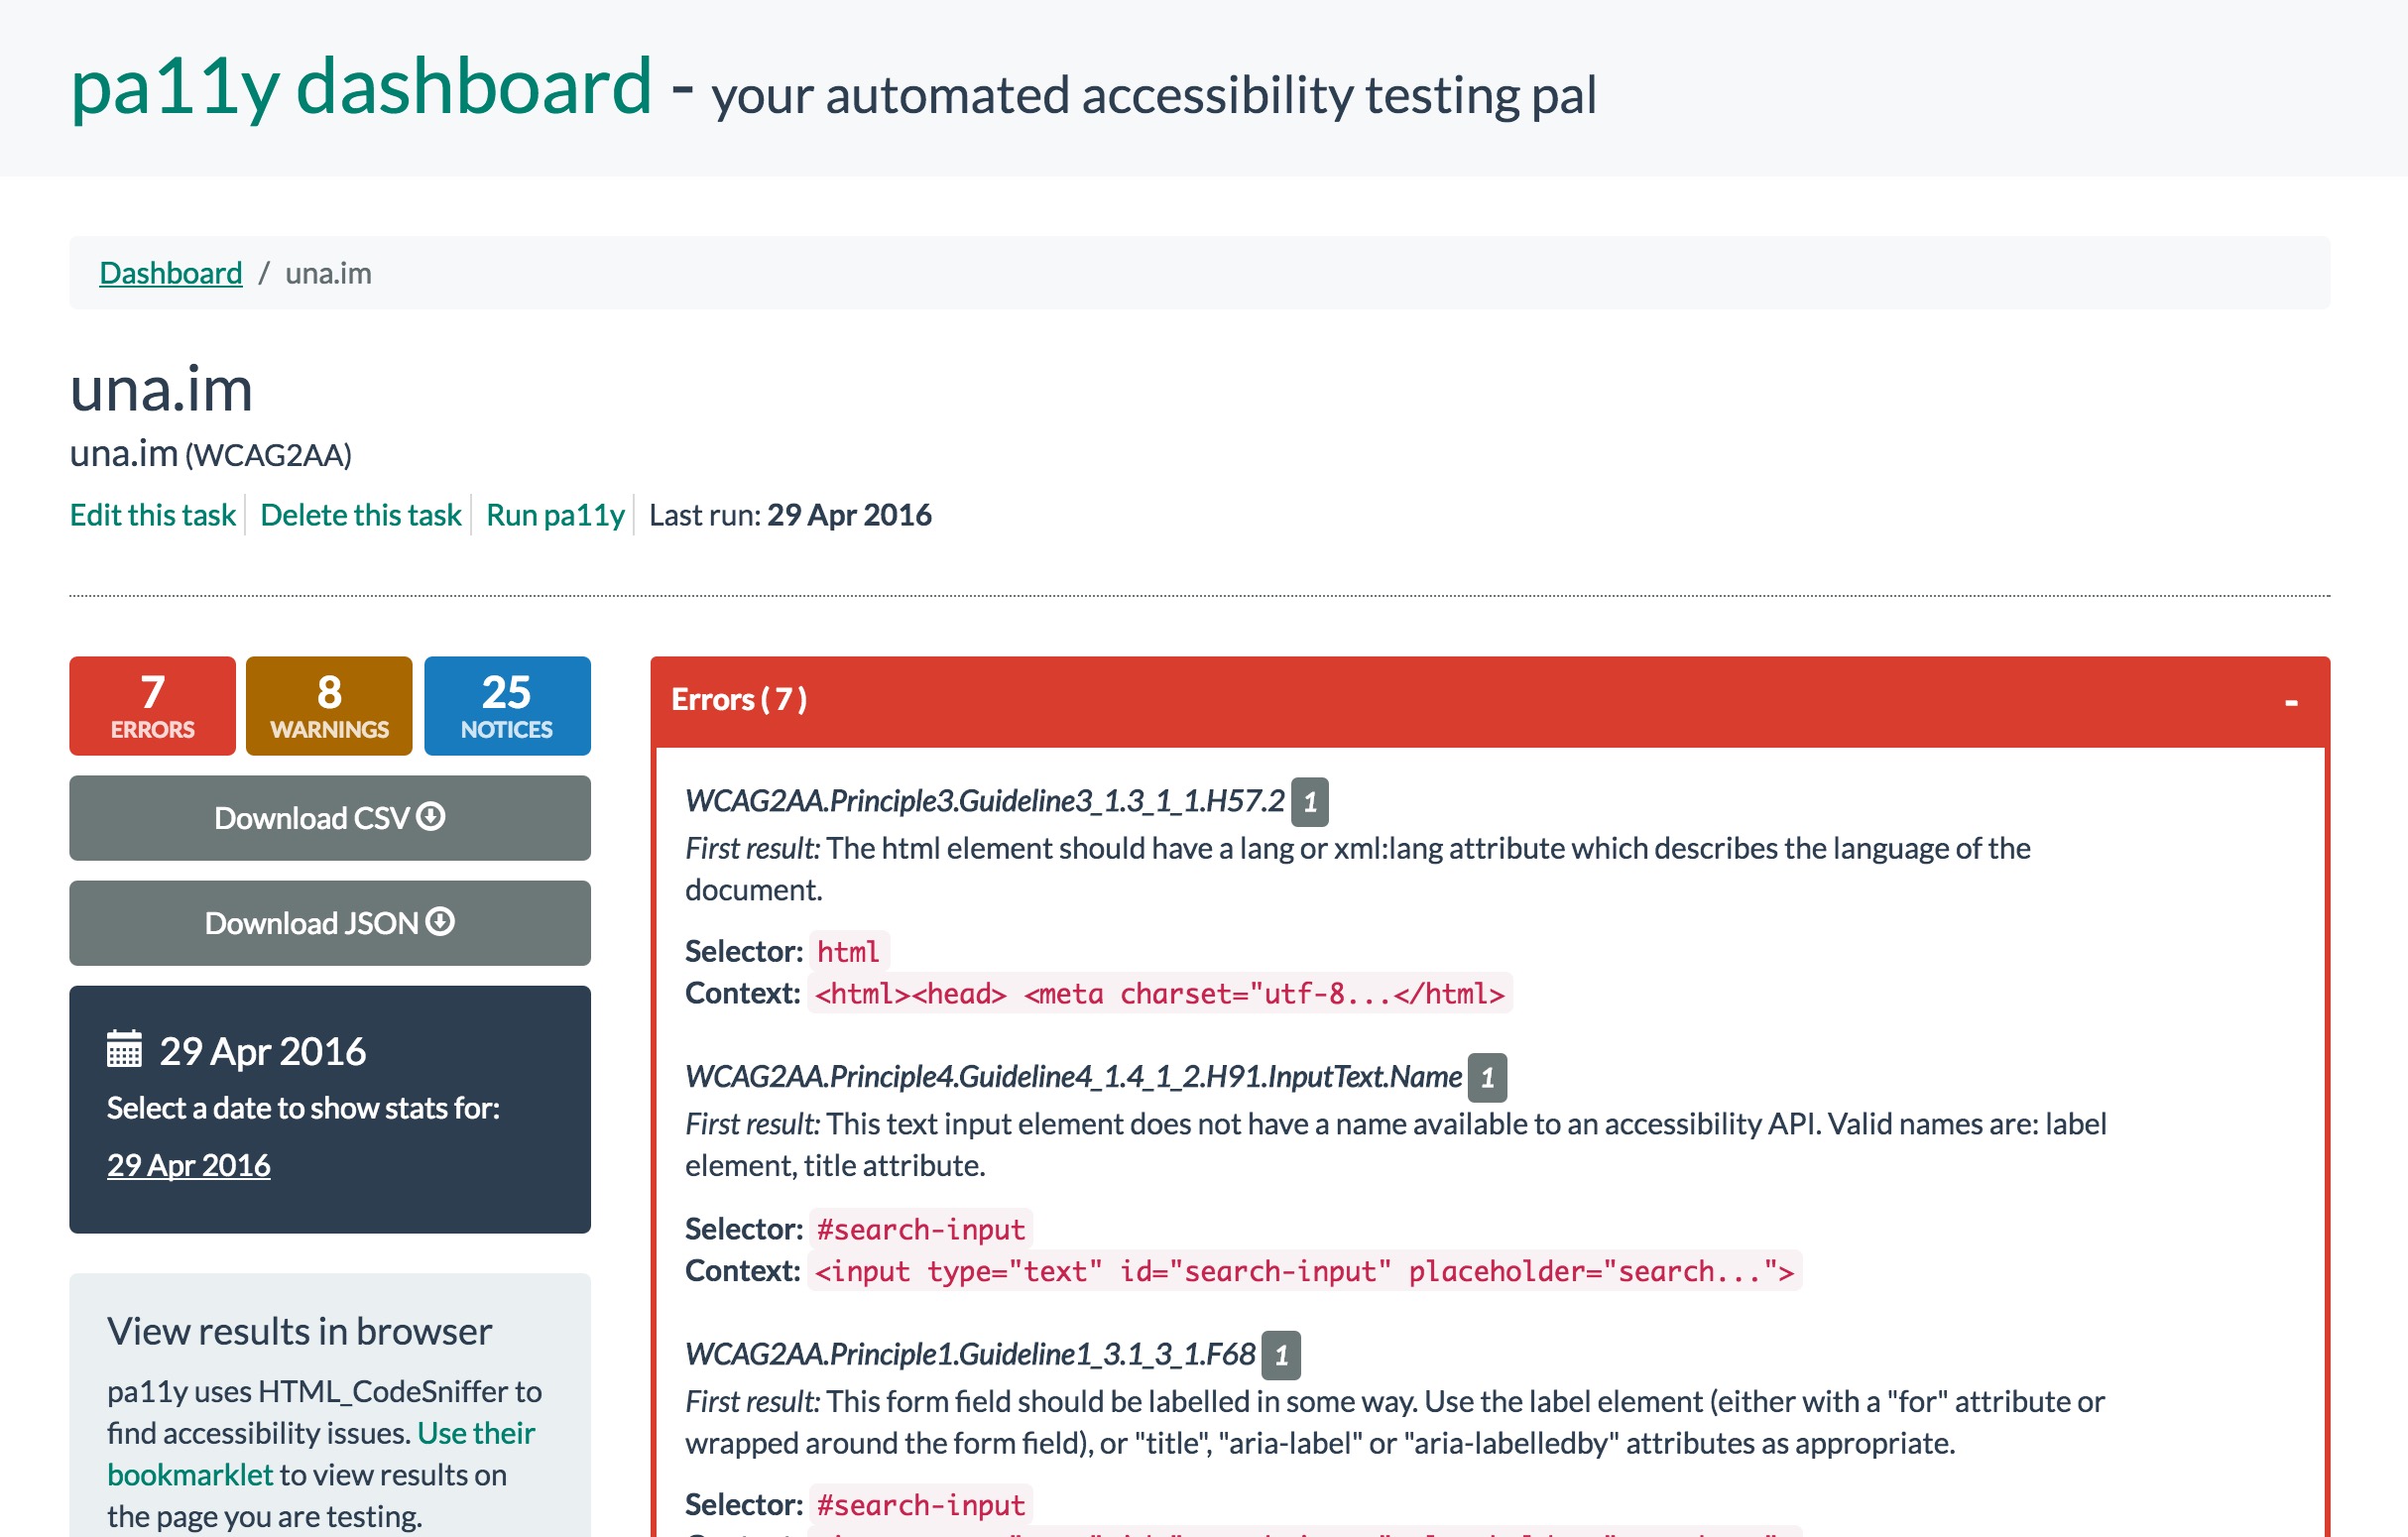
- Overview panel of errors, warnings, and notices based on your selected WCAG preferences (WCAG2AA is default)
- Downloadable JSON and CSV data
- 30 days of data stored by default
- Detailed explanation of accessibility violations
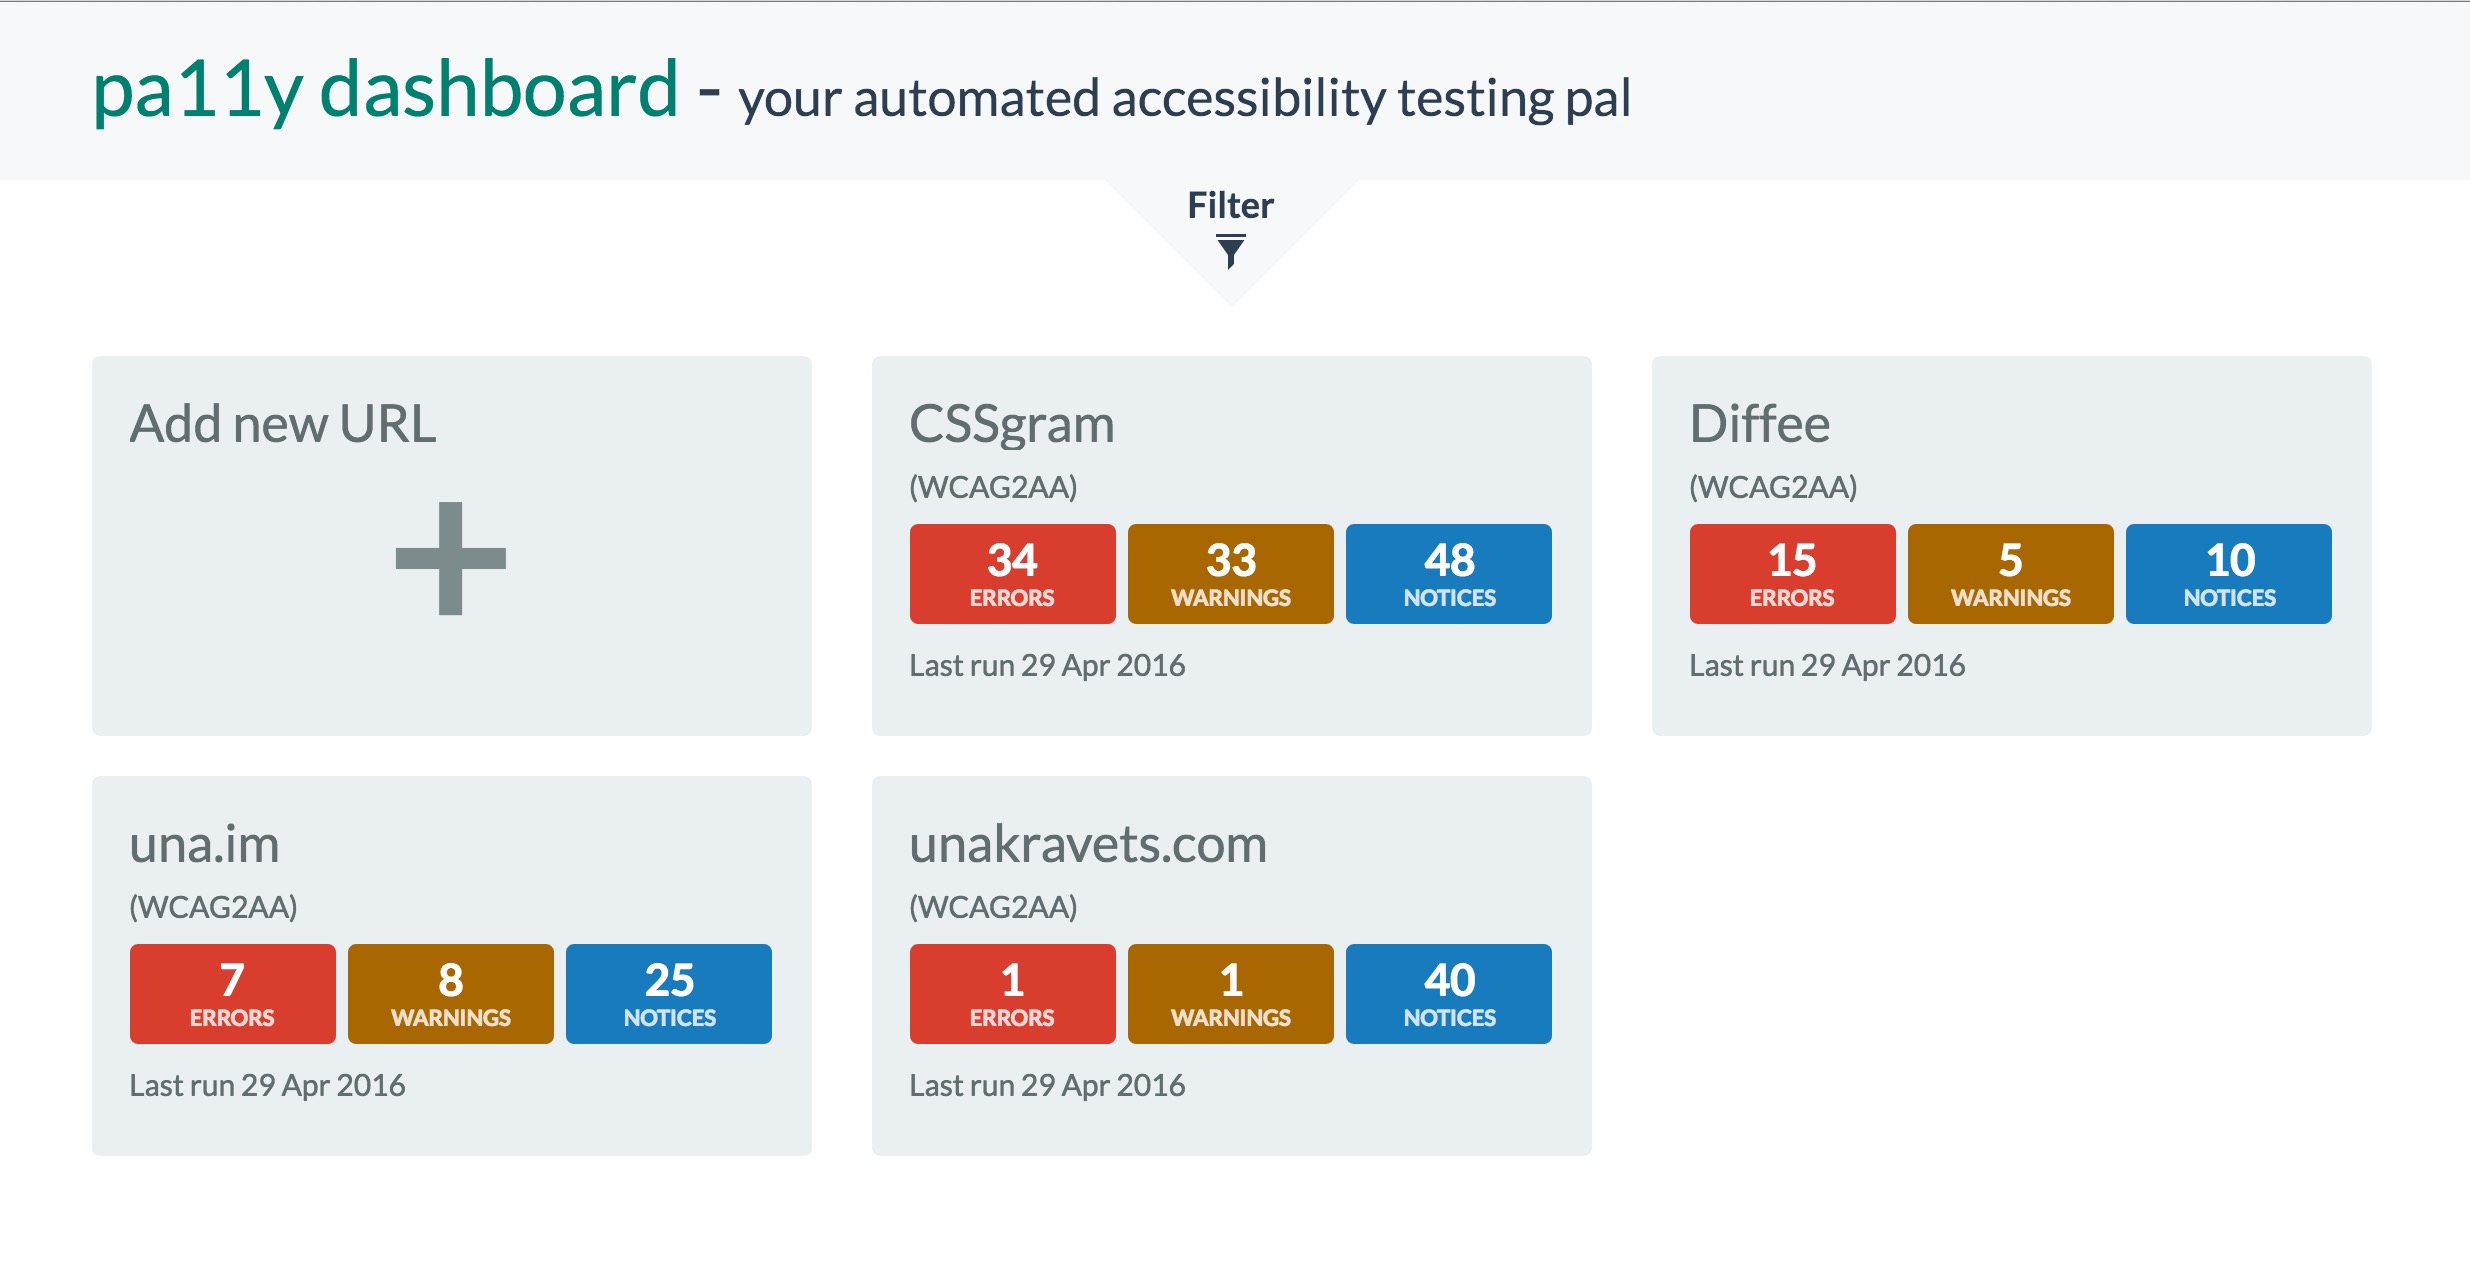
Those are a lot of awesome things! By default, it looks like this (you can see it live at pa11y.una.im):
Okay, so I know I have a little bit of cleanup work to do now on my sites. But before we go into shame 🔔 shame 🔔 mode, let’s learn how to set up our own!
Step 1: Spin Up a Droplet
Spinning up droplets is super easy! It takes ~55 seconds and 4 clicks to set up a MEAN-stack (Mongo, Express, Angular, Node) server on the cloud. DigitalOcean has a great tutorial on this, which I’ll cover here anyway:
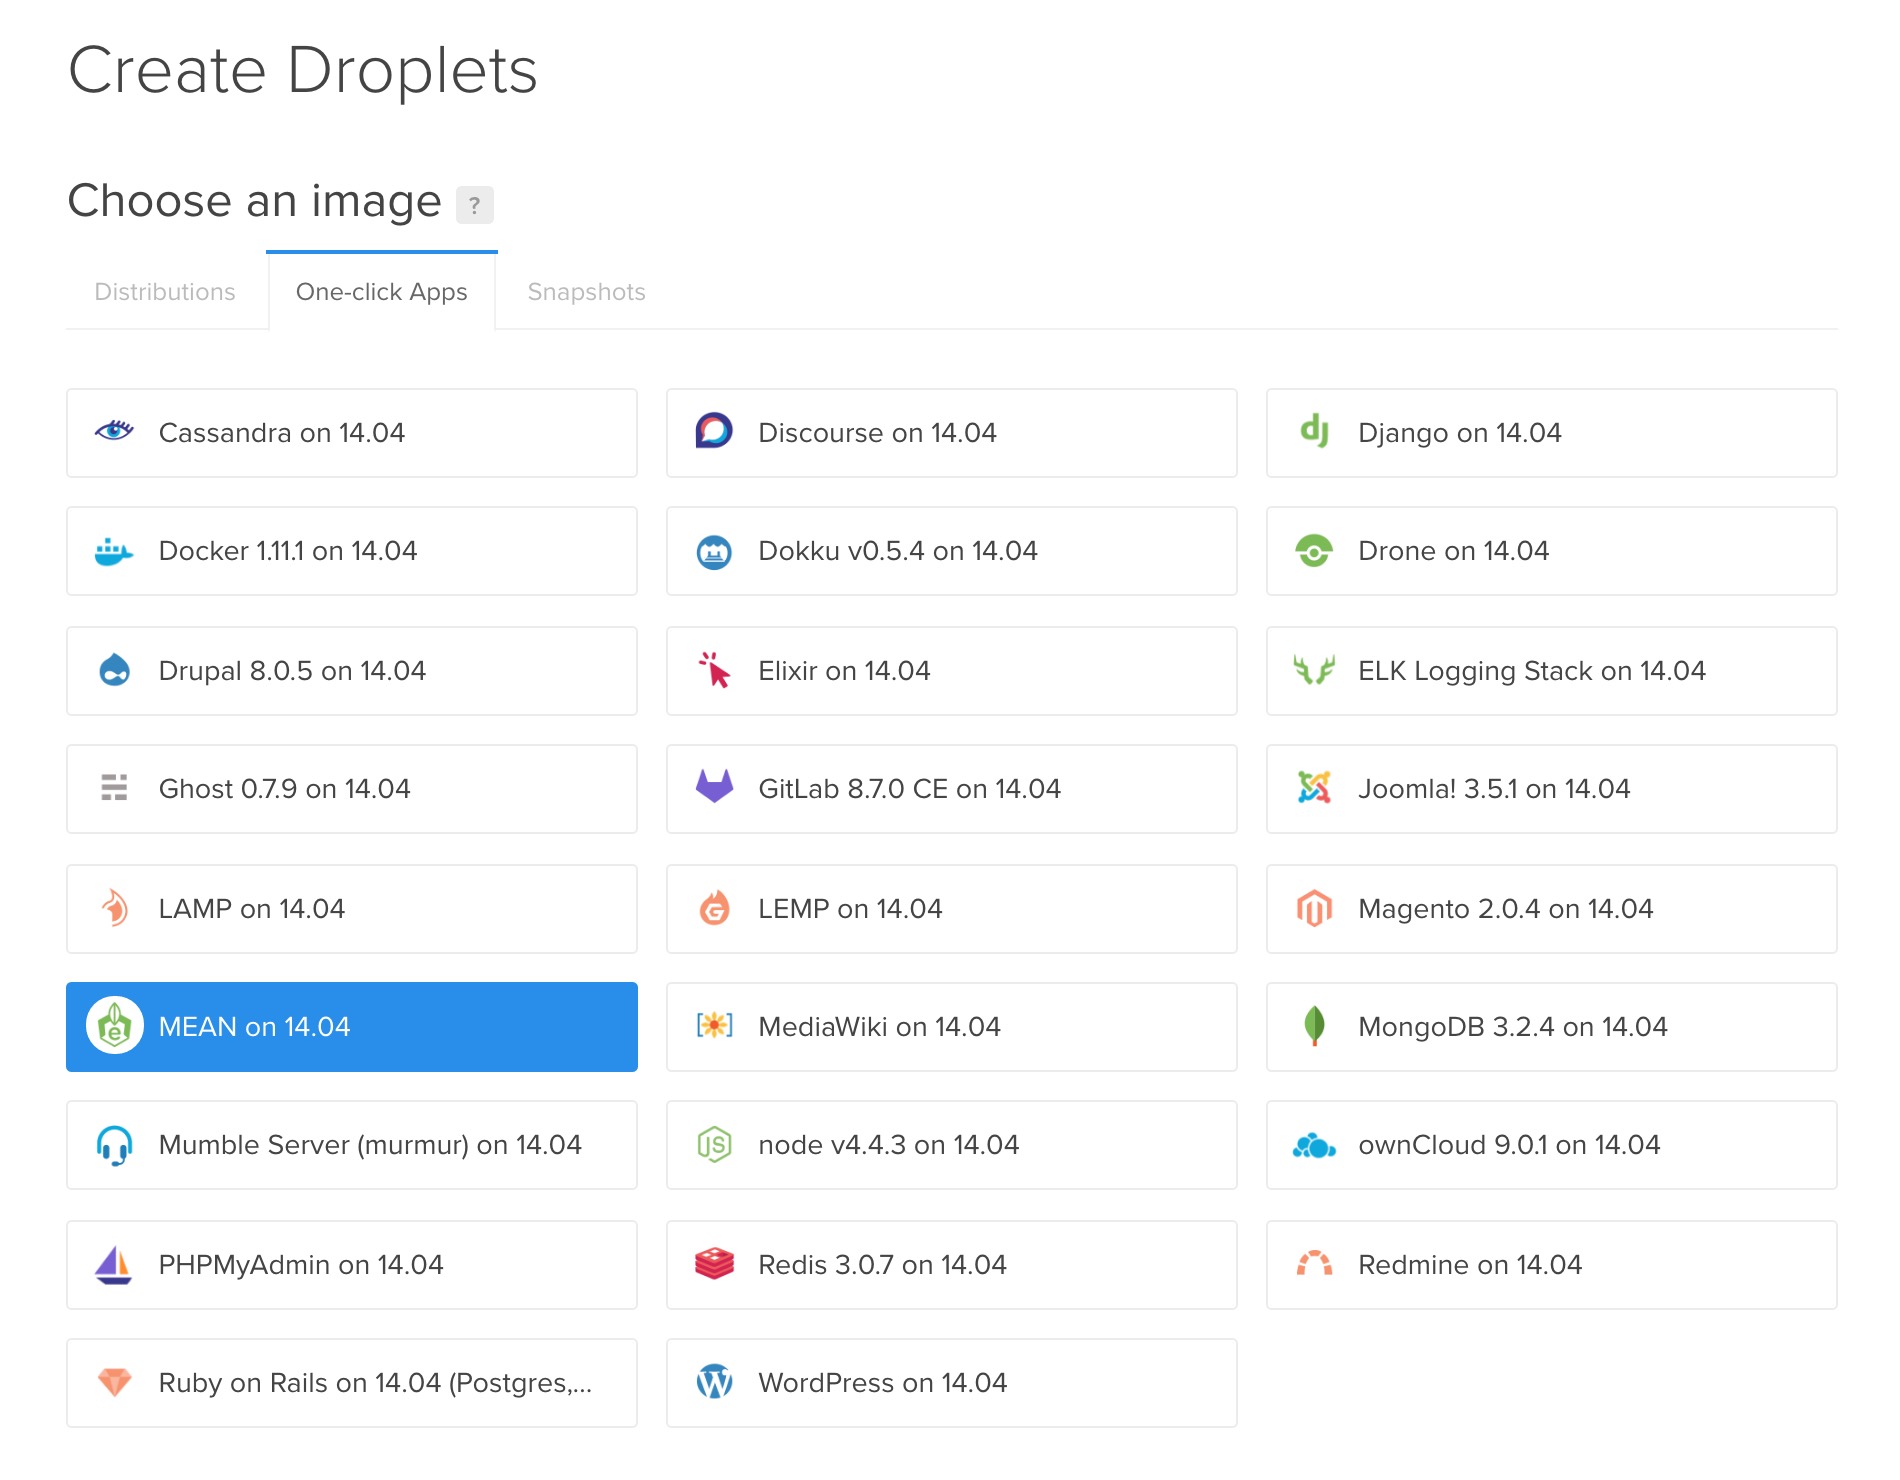
Once you hit the green CREATE DROPLET button in the upper right hand corner of the DigitalOcean website. Then, click the second tab (One-Click Apps) and find MEAN on 14.04 (or whatever the current version is — point is, we want the MEAN stack). Choose your size (the smallest plan should suffice), and then your data center region.
Once that’s done, add an SSH key. Check out this Github tutorial on SSH keys and how to generate them for more information. Basically, you want to find your public keying your ~/.ssh folder associated with your computer. This acts like a fingerprint for your system.
Step 2: SSH into Your New Server
Ok, cool — we now have a MEAN stack server running on a brand new droplet sitting in a data center somewhere in the world of our choosing :). Next, we’ll want to remotely SSH into it. In your terminal, type ssh root@<given IP address>. This IP address is from DigitalOcean. When it asks about the Fingerprint, type yes. You can’t just hit enter here — you need to actually type out “yes” (a mistake I made way too many times).
So once you’ve done that, you should now be inside of your virtual server! From your own computer! Woo!
Step 4: Install PhantomJS
We’ve got Node and MongoDB set up on this server now now, but another dependency we need is called PhantomJS. This gist is a great tutorial on its install. Basically, type these commands in order to make sure your system is up to date and you have the required packages:
sudo apt-get update
sudo apt-get install build-essential chrpath libssl-dev libxft-dev
sudo apt-get install libfreetype6 libfreetype6-dev
sudo apt-get install libfontconfig1 libfontconfig1-dev
If you’re not in there already, change back to your root directory with cd ~ and install Phantom with:
export PHANTOM_JS="phantomjs-1.9.8-linux-x86_64"
wget https://bitbucket.org/ariya/phantomjs/downloads/$PHANTOM_JS.tar.bz2
sudo tar xvjf $PHANTOM_JS.tar.bz2
Once is it downloaded on the server, create a symlink with:
sudo mv $PHANTOM_JS /usr/local/share
sudo ln -sf /usr/local/share/$PHANTOM_JS/bin/phantomjs /usr/local/bin
To make sure its on your system use phantomjs -v.
Step 5: Fork, Clone, Install Dependencies
Your visible sites are in opt/ with this setup, so you’ll want to get into that directory with (from the root) cd ~/../opt. Once there, you may see the existing demo directory called mean. Clone the pa11y-dashboard repo, or your fork of it (which I’d recommend for customization), with git clone https://github.com/pa11y/dashboard.git (or your cloned address).
Then cd into that directory with cd pa11y-dashboard and run npm install (remember Node is already installed because one-step app thing DigitalOcean gave us — yayyyy — but we still need to set up the repo itself).
Make sure you follow the pa11y-dashboard instructions, including the following commands:
cp config/development.sample.json config/development.json
cp config/production.sample.json config/production.json
cp config/test.sample.json config/test.json
Step 6: Up and Running
We’re almost there! Now, all we need to do is run NODE_ENV=production node index.js. This should start a server on port 4000 in production mode, so you’re able to see your dashboard if you go to <your ip address>:4000. (For example: 137.155.18.233:4000) in the browser.
However, there’s a little problem here. This only works while we’re running the command. If we log out or close the window, the command stops running and our dashboard goes offline. So to combat this, there’s a nifty little module called pm2. Pm2 is a process manager for node. You can install it with npm install pm2 -g.
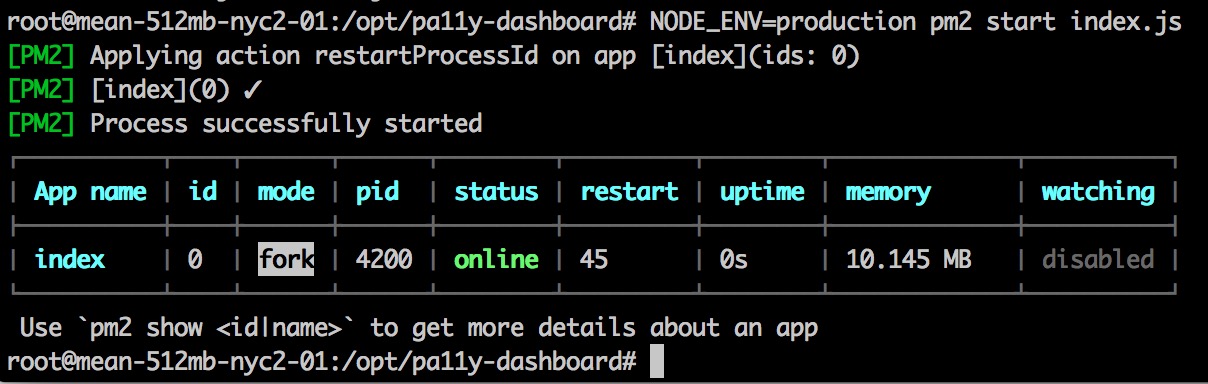
Once pm2 is installed, we can run a start command NODE_ENV=production pm2 start index.js or from the root directory pointing to our node task: NODE_ENV=production pm2 start ~/../opt/pa11y-dashboard/index.js. At this point we have a process running like so:
To create a nicer configuration, you may want to follow the steps from this post.
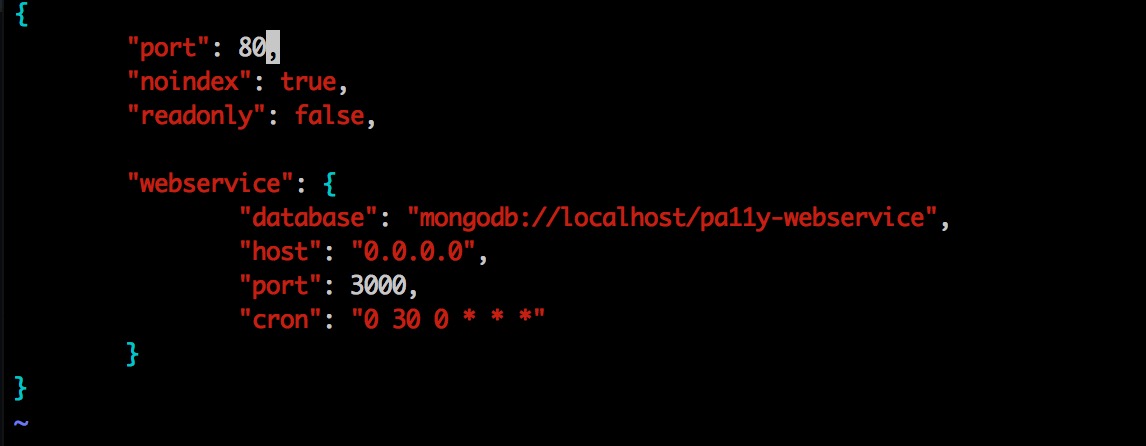
Step 7: Set the Proper Port
So this looks pretty good so far, but if you want to get rid of that :4000 and set the URL to be your web IP address, we’ll need to change that 4000 to 80.
This part is where it’s good to have a fork of the repo. If you fork the repo, you can make these changes locally and then pull the latest onto the server. However, we can also use vim to edit the files.
Inside the repo, type vim config/production.json to edit the production config and change 4000 to 80. There are a lot of good vim tutorials and cheatsheets. If you’re not familiar with it yet, I highly recommend you learn a bit!
We now need to rerun our program. So lets do pm2 restart <name> or just pm2 restart all if it’s the only thing we have running :P. <your ip address>:4000 will no longer work in the browser, but going directly to your IP should!
Important note for non-root users only: You may run into a problem if you’re trying to run a program on port 80 as a non-root user. This is for security reasons. To fix this, we can install libcap2 and give ourselves permission to run node with these two lines of code:
sudo apt-get install libcap2-bin
sudo setcap cap_net_bind_service=+ep `readlink -f \`which node\``
Step 8: Add Your URL
Okay, so that’s a weird URL to send someone to. You can add a redirect link, buy a domain name for your new dashboard, or add a subdomain to an existing site! This is the holy grail tutorial for managing your DNS from DigitalOcean, but I like to just create a subdomain for things like this — which is super easy with Name.com.

Now if you go to pa11y.una.im, you’ll see a pa11y-dashboard all set up! (Please note: I added my sites and then changed the config again, setting "readonly": true to disable the add button and prevent new sites from being added there by you all 😜).
Step 9: Customization
I haven’t done step 9 in the example above at the time of this writing (I clearly have some accessibility issues to take care of first!) but it’s easy to customize the HTML, JS, and CSS of this dashboard to your needs.
Please note: the CSS is written in Less and you just need to run make less to recompile CSS. There are other available make tasks like testing and jshint. So feel free to go wild! And share your customized dashboards below 💕!